1955 Chevy Pickup
 Fully Engaged
Posts: 211
Joined: Thu Jul 28, 2011 1:30 pm Location: Inglewood, CA Country: USA |
looking good there, looking good.
|
 Board Moderator
Posts: 9898
Joined: Fri Oct 20, 2006 12:40 pm Location: ARIZONA |
Finally getting back to work on this project.
Yesterday I cut some sheet metal and fabricated this control center for the air suspension system. I still need to reroute some of the lines and wiring and then fasten them all down, install some wire loom, etc. but this unit will be located under the bed of the truck. Hooked it up temporarily to a car battery and the compressors came on, filled the tank and then shut off like they are supposed to. Took the truck off the jack stands and then tried the controller and she came right up. Controller allows independent control of each wheel as well us front and rear together. 1968 Coronet R/T
ACTS 16:31 |
Board Moderator
Posts: 9898
Joined: Fri Oct 20, 2006 12:40 pm Location: ARIZONA |
Started a mock up assembly to check fit of panels and to see what's missing.
When I installed the doors I found the previous "customizers" had installed the striker plates upside down. Rear Fenders and Rollpan: Front fenders were seriously bent out of shape and the lower filler panel bolt holes were welded shut on one side. The latch panel never got painted and the upper filler panel needs to be blasted, repaired and painted. Soooo much fun I can hardly stand it. 
1968 Coronet R/T
ACTS 16:31 |
Fully Engaged
Posts: 165
Joined: Wed Jan 23, 2013 9:14 pm Location: Pahrump, NV Country: USA |
Great project there 68 Coronet R/T and your work speaks for it's self. Going to enjoy following this project. I have a 52 Chevy 1/2 ton 5 window sitting in my shop in Oregon I've been waiting about 18 years to get to. This makes the urge to get to it strong but till I get more room it can't make the trip to Nevada

|
 No Turning Back
Posts: 527
Joined: Tue May 08, 2012 6:53 pm Country: USA |
That guy took it to the right place, great job so far
man that color.... 
|
Board Moderator
Posts: 9898
Joined: Fri Oct 20, 2006 12:40 pm Location: ARIZONA |
Did some sandblasting and welding today.
Left step for bed showing some rust: Same step after a trip to the blast cabinet reveals a tear in the metal: Drilled a small hole at end of crack and then MIG Welded it: Here's the hood latch panel after sandblasting revealed some cracking (I welded these too but forgot to take a picture): Here's the upper fill panel for the grill with loads of rust: Cleaned up pretty good but could use a little more work: So glad I switched to crushed glass for blasting media. It does wear down fairly quickly but leaves a nice finish and doesn't darken the blast cabinet. 1968 Coronet R/T
ACTS 16:31 |
Board Moderator
Posts: 9898
Joined: Fri Oct 20, 2006 12:40 pm Location: ARIZONA |
I know what you mean about not having enough room. I have the 55 Chevy in the booth area, the 67 Jeep, my R/T and Harley all crammed into the other side. Have to move the R/T out of the garage everyday just to have a place to work. Took my Harley apart to install some gear driven camshafts and now I want to paint it before reassembly. I have a new gas tank for it still in bubble wrap but plan to sand the pin stripes out and go straight black. I should have my head examined for getting into this project when I have so much other work to be doing. 
1968 Coronet R/T
ACTS 16:31 |
I also switched to crushed glass and so glad I did. Don't have to pull the parts out of the cabinet to check progress any more, because I can see exactly what I'm doing in there. Great work on your projects Jim! |
|
Board Moderator
Posts: 9898
Joined: Fri Oct 20, 2006 12:40 pm Location: ARIZONA |
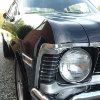
After sandblasting and welding cracks I applied epoxy primer, then filler, and sanded it all smooth.
Used Tamco DTM build primer on these panels, Wanda (premixed) base and ********** Universal Clear. Three coats of base and clear. I had a local jobber match the color by taking him a small section of metal I cut out when installing the roll pan. It looked good until I installed the panel.  I guess it really won't matter since every panel on this truck needs work. I'll get the other jobber in town to mix the next batch using the same piece of metal I gave the first guy and we'll see how that turns out. Installed the other step and front panels. This is a classic example of someone painting a vehicle in pieces and not getting the colors right. The truck bed appears blue in the pictures even though the step is clearly green. Another thing to note is that the driver's side of the bed is in front of a window receiving natural sunlight, the opposite side is under fluorescent light yet they booth show as blue. This next picture is the piece of metal the guy was supposed to match sitting on the newly painted latch and fill panels. Notice the lowest panel in the picture matches the piece of metal. I don't think I'll ever agree to finish what someone else started ever again. Anything that comes in will get the full treatment. 1968 Coronet R/T
ACTS 16:31 |
Board Moderator
Posts: 9898
Joined: Fri Oct 20, 2006 12:40 pm Location: ARIZONA |
Thought I would change things up a bit and work on the dash cluster.
Here it is as I got it: Disassembling: Check out the mud dauber's nest. You can see just a little in the first picture: Cleaned and reassembled. Notice I put .4 miles on it lubing and testing the speedo: 1968 Coronet R/T
ACTS 16:31 |
Return to Completed & In Progress Member Projects
Who is online
Users browsing this forum: No registered users and 100 guests
Powered by phpBB© 2000, 2002, 2005, 2007 phpBB Group
Advertisements by Advertisement Management