Partial cut, buff, and polish
15 posts
• Page 2 of 2 • 1, 2
 No Turning Back
Posts: 527
Joined: Tue May 08, 2012 6:53 pm Country: USA |
I think you are going to need a variable speed buffer. HF sells them dirt cheap along with wool and foam buff pads. I have a makita, but I've used their pads, work just fine. I like Meguiars 105 compound
|
Settled In
Posts: 20
Joined: Sun Dec 07, 2014 12:07 pm Country: USA |
For having to work on pillars and thin panels, especially with curves like A pillars near the windshield, you want to fit the pad to the panel and not work on the edges directly. Masking tape and fine line vinyl tape are great to help preserve the edges. Just remember that less pressure is need on small areas do to the PSI increasing compared to working with the same downward force on a panel that allows all the buffing pad to be distributed across a mostly flat panel. What variable speed tools do you have for sanding and polishing/buffing? A DA will not burn through a panel due to it not being able to generate the heat a rotary tool/machine can generate. Also, the major factor is paint thinness more so than heat. You can compound through paint/clear just like you can sand through anything when sanding by hand. That said, anytime you go through a layer of paint or primer, or whatever, it is a matter of friction from abrasives not the heat generated by the friction. A panel usually will start to buckle and warp before enough heat is generated to actually burn the paint. Just wanted to state all this because if kinda drives me nuts in the detailing industry and paint and body industry to constantly hear people say "burned the paint". I know what they mean, but some people don't and some people that use the term don't understand the concept I just described. It's like asking which came first, the chicken or the egg? Which comes first, friction and abrasion or heat and burning?
With that out the way.LOL Let's get down to the fact that if you have the concept down to work on guitars then you can work on the paint on a vehicle. Use the same caution and care, with the same technique that keeps you from going through the finish on guitars, and or throwing them across the room with a buffer/polisher. If you have a test panel/fender, and you are planning on working on the pillars/small narrow panels on your truck, then try to practice on the fender like it's those panels on your truck. And like I previously stated, if in doubt mask off your edges and corners. The rule of thumb for paint work is just that, stay about a thumbs width distance away from edges. And my rule of thumb for corners is stay about a thumbs length away from corners when sanding, cutting and compounding. Even a lot of top show cars aren't sanded, cut and buffed all the way to the edges. So it's definitely not worth doing so on a daily driver and non competition show car. Now if you know the thicknesses, have a paint thickness gauge and plenty of experience doing edge work, then that's a different story. Hope this helps, and if you have anymore questions feel free to ask. I will try to post some pics further explaining some of what I am talking about. |
 Fully Engaged
Posts: 355
Joined: Sun Aug 17, 2014 6:04 pm Location: Gulf Breeze, FL, USA Country: USA |
Goldmine of info here. I've got a DA, and was going to pick up a Harbor Freight VS buffer (thanks Novafreek for the feedback on that). Great tip on taping up the edges! Thanks a bunch. 
We hold these truths to be self-evident, that all men are created equal, that they are endowed by their Creator with certain unalienable Rights, that among these are Life, Liberty and the pursuit of Happiness.
|
|
Fully Engaged
Posts: 355
Joined: Sun Aug 17, 2014 6:04 pm Location: Gulf Breeze, FL, USA Country: USA |
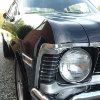
Practiced my cut and buff on my test panel. Didn't like the looks of a "partial" cut and buff, so I sanded the entire panel down to flat with my DA sander and 1200 grit disc, then buffed with McGuiars 105, then a finer grit compound (no. 7 on the scale on the bottle), then McGuiars showcar polish. Looks damned good.
Now that I've seen it, there's no turning back from the show car work truck.   We hold these truths to be self-evident, that all men are created equal, that they are endowed by their Creator with certain unalienable Rights, that among these are Life, Liberty and the pursuit of Happiness.
|
|
No Turning Back
Posts: 527
Joined: Tue May 08, 2012 6:53 pm Country: USA |
nate... once you look at quality like that, anything less just won't do... do it!!
|
15 posts
• Page 2 of 2 • 1, 2
Return to Cut, Buff, Polish & Detail
Who is online
Users browsing this forum: No registered users and 42 guests
Powered by phpBB© 2000, 2002, 2005, 2007 phpBB Group
Advertisements by Advertisement Management