Introduction - TR6 Restoration

Show off your work! Anything from final results to full start-to-finish project journals.


Settled In
Posts: 55
Joined: Wed Jan 01, 2020 7:56 pm

Country:
USA
PostPosted: Sun Mar 08, 2020 6:44 pm
I've quickly being reminded why I like wrenching so much better than body work :-)

I started the process to skim panels in filler this weekend and block sand. I started with 80, then 180, and then 220. With guide-coats. I started with the doors first, figuring they were fairly flat, and small enough for an easy start. Lessons so far:

1. I was way way to sloppy with the application of filler on the first panel. Too thick, too uneven. Too sloppy with the transition line near the top of the door. That caused so much more work than necessary.
2. Block sanding even with 80 grit, takes a LOT of effort to get to flat when the filler is sloppy. I lost feeling in my arm some time yesterday.
3. This is going to take forever, and a day.
4. A rasp is your friend to knock down any really high areas.
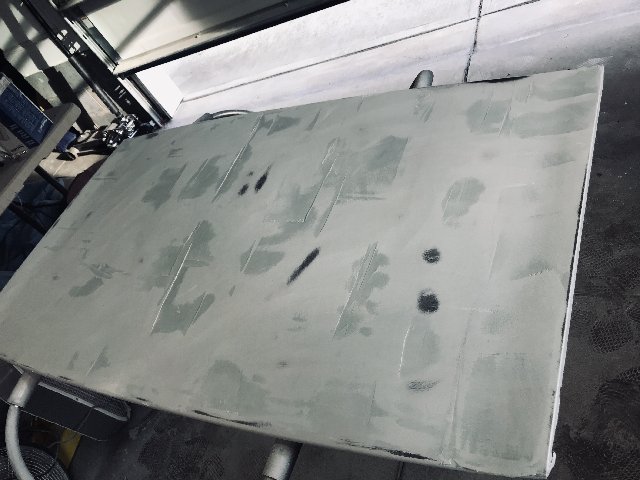
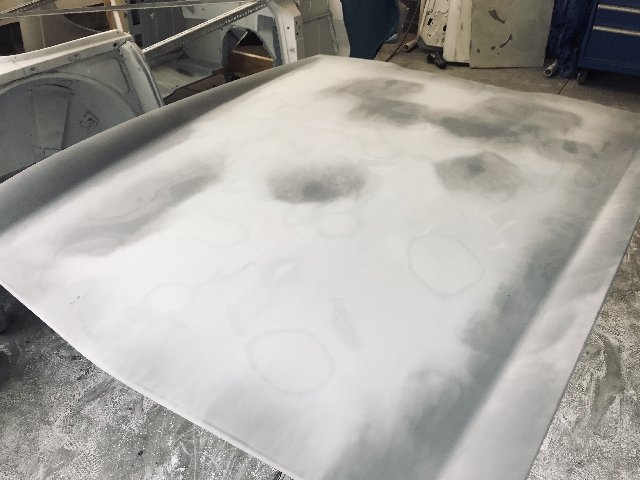
5. My boot (trunk) lid is very very uneven. The first coat of filler blocked down still left some low and high spots. It's going to take a second layer of filler.

Questions:

1. I've sanded through in a couple of high spots. It will be sometime (a few weeks) before I convert the garage back into "paint mode". Do I need to worry about this duration before I shoot everything with high build primer?
2. I'm baffled at the correct way to skim and block more complex parts like the fenders. There are complex concave and convex areas. Do people only skim the flat areas? The tight concave parts are the biggest concern. Flexible sanding blocks?
3. Would starting with 40 grit make life easier?

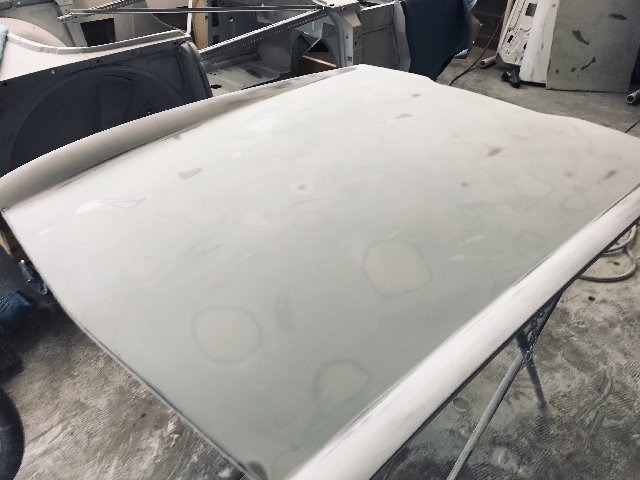
First coat of filler on the door. Yes, it was that sloppy
Image


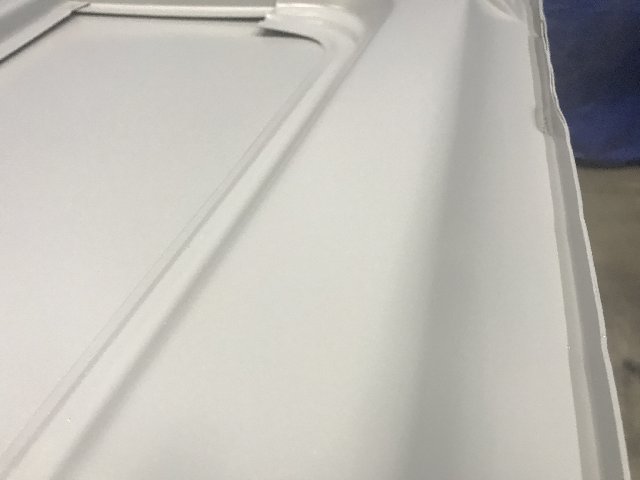
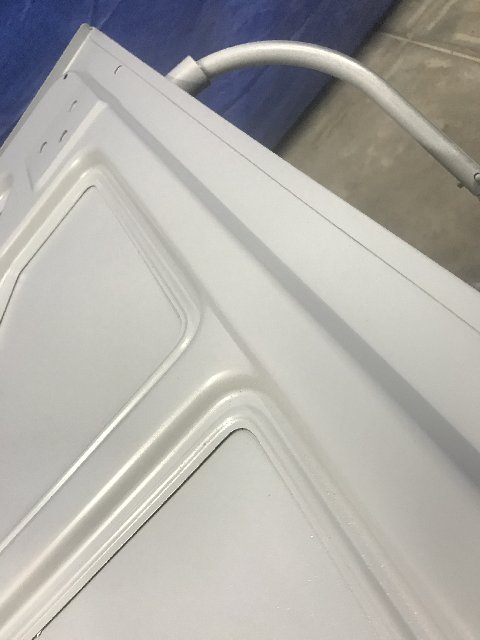
Door after sanding, and a bit of glazing compound
Image
\

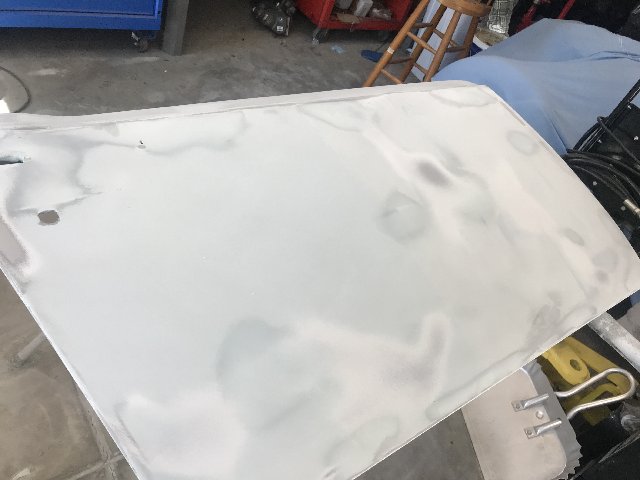
Boot lid showing the significant highs and lows
Image

User avatar

Board Moderator
Posts: 9891
Joined: Fri Oct 20, 2006 12:40 pm
Location: ARIZONA
PostPosted: Sun Mar 08, 2020 11:05 pm
I rarely skim an entire panel with filler.
Using 2 coats of black epoxy primer on the bare metal, I then lightly block sand to reveal any lows spots on the panel. Skim those with filler extending past the low spot and then block sand sand until the feathered into the surrounding epoxy primer.

IF the entire panel needs work, I shoot 2 coats of polyester primer (Featherfill G2), guide coat and block sand.

This quarter panel needed way too much filler work:
LH Quarter Filler Work Needed 1.JPG


Here it is after shooting polyester primer.
LH Quarter - Poly Primer.JPG
1968 Coronet R/T


ACTS 16:31


Settled In
Posts: 55
Joined: Wed Jan 01, 2020 7:56 pm

Country:
USA
PostPosted: Tue Mar 10, 2020 9:18 pm
Follow-up question: When you are block sanding the really curved areas, are you using flexible blocks? I noticed that TP Tools (which so far has been my go-to online supplier). I know not to sand by hand and induce finger waves. Or are you just using smaller flat blocks?

The job is really getting in the way of finishing the trunk panel. I'm also going to borrow a powered file sander to see if that speeds up my initial flattening of the filler.

User avatar

Board Moderator
Posts: 9891
Joined: Fri Oct 20, 2006 12:40 pm
Location: ARIZONA
PostPosted: Wed Mar 11, 2020 9:15 am
I use a Durablock round sanding block for both concave and convex areas.
https://www.amazon.com/Dura-Block-AF440 ... 7882&psc=1

Summit Racing has a special running 3 for $9.99 but you pay shipping. I have been using the same block for a long, long time now.

Another one I recommend for tight spots is the teardrop block.
https://www.amazon.com/Dura-Block-AF440 ... B007VTSVTA

Don't care much for their larger sanding blocks though. I like the rigid wooden handled blocks for getting larger panels straight.

Remember to sand in a crisscross manner. Basically an X pattern working the panel.
And let the sandpaper do the cutting. Pressing down hard on the sanding block is a no-no.

You want to use coarse grit sandpaper to get things flat and strait. You can put a light skim coat of filler on after and use 180 to finish it for primer. Another trick is to get some Evercoat Honey
https://www.amazon.com/Evercoat-1249-Pl ... 9469&psc=1

One can will last a very long time. You just add a little to your filler and mix it really well before adding hardener. Makes it creamy and easing to spread thin.
1968 Coronet R/T


ACTS 16:31


Settled In
Posts: 55
Joined: Wed Jan 01, 2020 7:56 pm

Country:
USA
PostPosted: Wed Mar 11, 2020 6:36 pm
Great info. I already have that round one, as it came in my 7 pack of Durablocks. I'll go ahead and order the other two items you mentioned. Thanks!


Settled In
Posts: 55
Joined: Wed Jan 01, 2020 7:56 pm

Country:
USA
PostPosted: Fri Mar 20, 2020 5:35 pm
Bless y'all that do this for a living and stay sane. I've finally finished with the hood, that just leaves the the four fenders, and the areas on the tub that I'm actually going to block sand. There is very little of the tub that ends up visible on a TR6 after the fenders are bolted on. I'm sure it's not perfect, but it's as close as I can get it, and I'm hoping its good enough as a base for high build primer (and more sanding......).

After a layer of skim coat, then 80 grit, then glazing, then 180 and 220. Long block on the flat part, some flex blocks (the pool noodle things) on the curves.
Image


Image


After some 1K spray can primer to seal over the sand through spots
Image


Settled In
Posts: 55
Joined: Wed Jan 01, 2020 7:56 pm

Country:
USA
PostPosted: Tue Mar 31, 2020 8:14 pm
After wrapping up filler and then sanding, sanding, sanding, sanding......I finally got to the point today where I'm starting to shoot Evercoat Uro-fill, as my high build. I started with the backs of the doors, and the back of the bonnet / boot, to get a feel for how it would lay down. I'm not trying for a Pebble Beach car here (thats obvious to everyone I know), so I didn't spend much time sanding / prepping the bottoms of the panels. I will know more tomorrow after I shoot the show side of the panels, that I've spent all this time prepping.

Lessons Learned today:

1. Never / ever buy primer mail order. Getting that stuff mixed well when the can was completely full was **** near impossible. The local store would have shaken it for me. Given we are in lock-down the local paint shop was open the last time I was there, but no counter service, call-in only and they kind of slid my order out the locked door. That probably works for their commercial customers with accounts. I don't think they do much retail, very friendly though so far. Hopefully, this lock-down will be over before BC / CC paint discussions.
2. Is it possible to ever get all the residual sand out from under the ribs of a hood? I'm blown, blown, and blown some more. There is still a bit of sand in the paint.
3. Over-all I thought the Uro-fill laid down okay. Getting a bit of orange peel in places, my gun to surface distance is too variable. Something to continue to work on. Traverse speed is also not very consistent. But that's why there are pros and amatuers.
4. I had no idea I'd go through this much sand-paper. But I'm learning that sanding sucks, and sanding with dull paper is even worse. Change early, change often.

My plan after this is to sand with 400 and then 600 and make the go / no go decision on BC / CC myself. I'm gaining a bit of confidence, but still pretty nervous about screwing up the top coats.

And some pics:

Image


Image


Image


Settled In
Posts: 55
Joined: Wed Jan 01, 2020 7:56 pm

Country:
USA
PostPosted: Fri Apr 03, 2020 9:26 am
So Day 2 was a success, but Day 3 of high build primer was a bust. I shot the tops of the boot, bonnet and doors and was quite pleased with how the paint laid out. With that renewed confidence, I went to spray the exterior of the fenders, and things fell apart.

1. I couldn't get the fan quite the right shape. It was a bit shorter than usual, and much too center weighted, even with the fan control backed all the way out. I will say that the paint was thicker on Day 3 verses 2, but I assumed that was because with some paint now missing from the can, I got a much better stir, and it was just thicker. It shot fine with the 1.5 tip on Day 2, but with the thicker paint from Day 3, I maybe should have used the 1.8. The TDS for Euro-fill says 1.6 to 2.0.

2. I have some very dry / gritty paint on portions of the fenders. Nothing like the smooth paint from Day 2. Now sure if that is from Item 1 above, or from overspray. I shot all the hood / doors straight down. The way I set up the fenders, I shot the inside lips on one knee almost straight up. I'm wondering if that put an excessive amount of overspray in the air. See last pic.

I'm going to go hit them with some 320, or 400, and see if the texture comes off easily. If not, I'll sand with 200, and then shoot another coat today.

Image


Image


I was quite happy with how well the paint on the hood laid down.
Image


And here was my set-up for the fenders. You can see the inner lips faced the floor so I showed those "up" from the bottom.
Image

User avatar

Board Moderator
Posts: 9891
Joined: Fri Oct 20, 2006 12:40 pm
Location: ARIZONA
PostPosted: Fri Apr 03, 2020 10:22 am
For build primer 1.8 tip is minimum I would go with.
You will be sanding it anyway so should be okay.

Hopefully you are using a guide coat prior to sanding. 3M Dry is what I like.
1968 Coronet R/T


ACTS 16:31


Settled In
Posts: 55
Joined: Wed Jan 01, 2020 7:56 pm

Country:
USA
PostPosted: Fri Apr 03, 2020 11:22 am
'68 Coronet R/T wrote:For build primer 1.8 tip is minimum I would go with.
You will be sanding it anyway so should be okay.

Hopefully you are using a guide coat prior to sanding. 3M Dry is what I like.


On a positive note, some 400 wet took off the dry texture with no problem. Unfortunately I won't have that opportunity to fix a mess-up like this when shooting the BC / CC. I'm thinking about only shooting 2 panels at a time for BC/CC rather than 4, as I think this will dramatically reduce the over-spray in the air. Of course, it will also take me twice as long, and I'll kill twice as much time on clean-up.

I used aerosol guide coat when filling / shaping / blocking the panels between the epoxy and the high build. Do I need to use guide coat again when wet sanding? All I have on hand is the spray type guide coat.
PreviousNext

Return to Completed & In Progress Member Projects

Who is online

Users browsing this forum: Google [Bot] and 63 guests