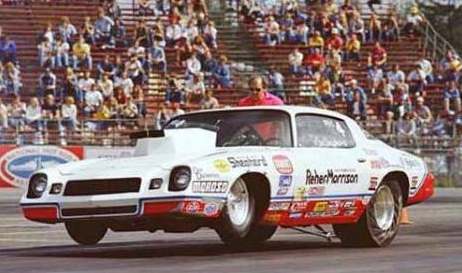
Since the TA project is on the back burner, I’m gonna turn my cousins 78 Camaro Pro Bracket car into a Reher and Morrison tribute. The car runs low 9s, and is in the shop to do the head gaskets and typical trans maintenance. We have talked about it for a while.
Here it goes
https://i.imgur.com/0ugEc1I.jpg
https://i.imgur.com/14NTd38.jpg
https://m.imgur.com/14NTd38
https://images43.fotki.com/v457/photos/ ... 978-vi.jpg
I have the week off for vacation but nowhere to go due to covid so I decided to start with the front clip. It’s a one piece fiberglass unit that I am just buzzing to get smooth before hitting it with epoxy before high build. The main purpose is to get rid of the t tops on the car. I bought a donor Firebird for my project and scored a hardtop for this purpose as well. We will graft that onto the Camaro. The doors and trunk are also fiberglass and will also receive the same tickle and prayer level of attention before epoxy.
Thanks for looking
JT
New Pro Stock tribute project
Fully Engaged
Posts: 166
Joined: Mon Apr 27, 2020 8:17 am Location: Northeast N.J. Country: USA |
|
 Board Moderator
Posts: 9898
Joined: Fri Oct 20, 2006 12:40 pm Location: ARIZONA |
Be sure to post pictures of your progress.
I don't do much fiberglass work myself but figure one day it will arrive at my door. 1968 Coronet R/T
ACTS 16:31 |
|
Top Contributor
Posts: 6235
Joined: Tue Sep 16, 2008 1:17 pm Location: Pahrump NV. Country: USA |
Are you gonna shorten up the rear end? and do a 4 link????
I am gonna be replacing the upper four link mounts and Lower Torque Boxes and a Tub kit maybe a Torsion Bar kit as well on my Kids Mustang some time in the next few weeks. as soon as the Kit gets here. Already did the floor repairs and reinforced the Frame rails. Found the lower Torq boxes were all cracked so all this extra work is going down. Dennis B.
A&P Mechanic, FCC General radio Telephone Operator Line Maintenance A&P Mechanic and MOC Tech specialist. |
Fully Engaged
Posts: 166
Joined: Mon Apr 27, 2020 8:17 am Location: Northeast N.J. Country: USA |
Thanks for your responses to the post.
You guys are some of the cornerstones to the site . The mechanicals will stay the same except for some required maintenance and repair. The typical routine for this bad boy is some love before the bracket finals and the it’s good for the winter nap and ready to go in the spring. No bracket finals for my cousin this year due to hanging back and not racing enough due to the C19. The specifics: 407 abc - 780 HP PG trans 2800# with driver Full cage Mono-leafs with caltracs The rear is a stock length 8.5” with a 4.10 gear set, shod with 10” x 30” Hoosier radial slicks. It runs low 9s @ 147+ and has been in the 8s. This is the “B” car, the “A” car is his 69 Chevelle that runs only in the 9.6 to 9.8 range :  So the thing works and will not be back-halved any time soon. As far as the fiberglass goes I made all the repairs required so far. Got the itchiness over with early on. The front clip, doors and trunk all come off so it will be easy to get the prep done. I’ll hit the body work while my cousin wrenches on it this off season. Doright, good luck on the 4 link. Make a thread on that too, the bars will need paint too right. Not a chassis builder by trade but post questions if you have them I’ll definitely post up pics. This build is a TY to my cousin and all he does for me. I worked for him PT in the 80s when his shop had gas pumps. They went away in ‘89. I never gave the keys back and have the run of the shop to this day. It’s where I did the work on the TA this past year. This is gonna be a blast! Questioning how to go about it though honestly? The existing paint will be buzzed smooth and a blast of epoxy applied to seal it in as a foundation. I plan to do the white, and then ytape off the blue stripe and do that. Then finish the bottom with the red. Not sure of doing it all in base coat layers and then clear it all or to do each color in single stage paint. I have read about mid-coat clear layers, and question if this is something to use when doing graphics like I plan. Open to suggestions. Thanks JT |
Fully Engaged
Posts: 166
Joined: Mon Apr 27, 2020 8:17 am Location: Northeast N.J. Country: USA |
Some pictures from today
    Some from the other day   |
Fully Engaged
Posts: 166
Joined: Mon Apr 27, 2020 8:17 am Location: Northeast N.J. Country: USA |
I was thinking more about my plan of attack for the painting.
The paint will consist of an overall white, with a blue stripe and a red band around the lower part of the car. My thought is to paint the white as much as required and clear it. Then I will scuff the area required for the blue stripe and clear over that with a thin clear coating. Then I will scuff the clear over the blue and paint the red band along the bottom and clear the whole car. Seems like more in material but more forgiving for a novice What say the pros? Thanks JT |
|
Top Contributor
Posts: 6235
Joined: Tue Sep 16, 2008 1:17 pm Location: Pahrump NV. Country: USA |
To do the car right in my opinion you should really do the shortened rear end and Tub it with a 4 link like pictured.
 Might even shave a few tenths off the times? My sons car should be close in performance, I been pushing things.... I am not a fan of small tire cars. Thats why I am pushing for tubs! a shortened and tucked rear is only a few welds away! 9s is REALLY fast that's truly impressive How much are you guys Squeezing or Spraying? I have some other builds coming down the line soon you'll like I am sure. Like the 4.125 bore LS aluminum block I picked up yesterday.... that's a top secret build don't tell my Ol'lady! or my kid lol ! I am gonna put it in my Vett. then I am looking at a 2 speed and a 9 inch independent rear! same stuff in a internet car named Ruby. Dennis B.
A&P Mechanic, FCC General radio Telephone Operator Line Maintenance A&P Mechanic and MOC Tech specialist. |
Fully Engaged
Posts: 166
Joined: Mon Apr 27, 2020 8:17 am Location: Northeast N.J. Country: USA |
A big tire will actually slow the car a bit, but it will be more consistent bracket racing. There are several small tire cars at our track running in the 9s. The car runs those times NA with no power adders. Compression is up around 15:1 I think. Both his cars are on alcohol with setups from Killer Ron’s. The engine was a mule from one of the best engine builder in No. NJ. The rest of the drivetrain is a PG and 4.10 GM10 bolt. The car is light so the rear strength is not an issue. Some day the car might see a back-half / 4 link, but not for a while. The 9.40s it runs are deep staging too.
The goal is not to make an exact replica if the R&M car, just mimic the paint scheme and have a little fun. My cousin is also going to get a decal made of his shop logo and have that on the door rather than the R&M logo. Again, the car will need paint after the roof swap and this is as good as any color combo. The big deal is to get rid of the black t tops that make the car hot as an oven. The white roof will be much better. A bigger difference will be the cowl hood vs the old school pro stock scoop. I will paint the cowl red and add the blue band. Right now the hood is black. He might try to get one or swap hoods with someone looking for a cowl hood. Even if we get a flat fiberglass hood I can graft on the scoop. We’ll see. If I get off my **** now maybe I’ll have some more pics later. Epoxy and beers are calling my name |
Top Contributor
Posts: 1397
Joined: Thu Jan 27, 2011 2:16 pm |
this reads and looks like a wicked project!
one thing i have ever ran into and seems to need addressing here: how do you get all that rubber off behind the rear wheels??? |
Fully Engaged
Posts: 166
Joined: Mon Apr 27, 2020 8:17 am Location: Northeast N.J. Country: USA |
Tomsteve.
The thing is these units are tools more than jewelry. When the rubber builds up enough you just hit it with a scraper and a rag. Don't worry about getting it all off and making it look nice. Next week there will be more. I hit it with a hard nose scraper and one of the whizzer pads my cousin has for gasket surface cleaning. Then I just hit it with the DA to level the paint surface On my Spirit I have some film made for keeping high abrasion areas protected. It is a marketed product for detailers, and I got a roll from a dude that I was working with as I was commissioning the machinery that slits it into the package sold to auto detailers. I'll probably use it here too. I have yet to change it out on my car. The small tire cars make less of a mess on the quarter panels. The big tire on my cousin's Chevelle makes it a must to use a hard nose scraper every tire change. Some pictures from today        Thanks for looking JT |
Return to Completed & In Progress Member Projects
Who is online
Users browsing this forum: No registered users and 87 guests
Powered by phpBB© 2000, 2002, 2005, 2007 phpBB Group
Advertisements by Advertisement Management