Progress on my 68 Dart, not done, but soon.
31 posts
• Page 2 of 4 • 1, 2, 3, 4
Fully Engaged
Posts: 162
Joined: Sun Apr 01, 2007 6:47 pm Location: Dallas, TX |
That rear suspension was standard on the fastest car ever sold by any car maker, the 1968 Hemi Dart. Those cars ran 10 second quarter miles in the late 60's.
Dallas, TX
 |
Other than the front guards and grille, this car is exactly the same as what you and I (and the rest of Australia) would call a VF/VG Valiant Hardtop. The sides are dead flat and I agree they would take some skill to make them look perfect. |
|
Fully Engaged
Posts: 446
Joined: Thu Feb 15, 2007 5:23 pm Location: Ballarat, Victoria, Australia |
I didn't realise that ... I've seen chargers and other Valients, but never really noticed any hardtops ... The Hemi 6's were faster than the local V8's I thouhgt too
No wonder the big american v8's were even faster ! seeya, Shane L. The nutty Citroen guy...
|
|
Here is the Australian VG (70-71) version:
 The earlier VF model had round headlamps. |
|
 No Turning Back
Posts: 686
Joined: Sun Jul 09, 2006 8:50 am Location: Rockville, MD |
Hey 6t8dart, I've been looking at the picture of your door.
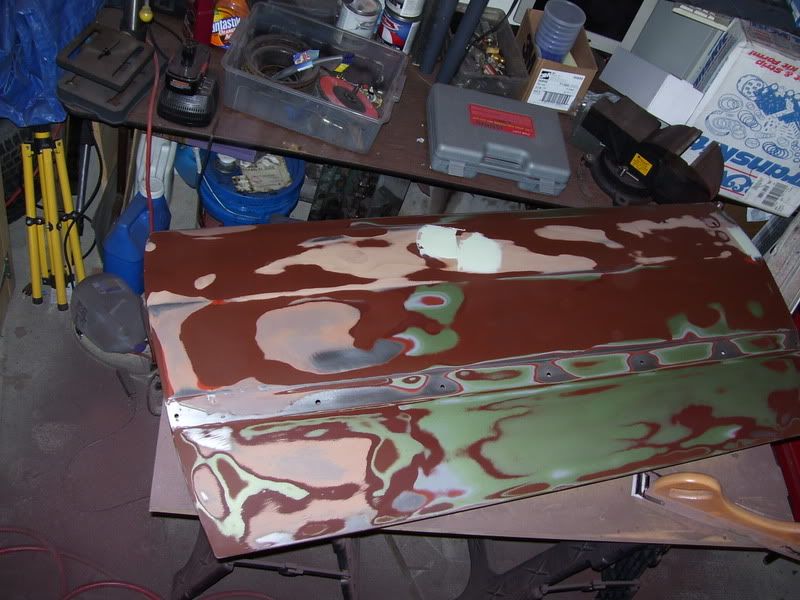 It's quite a myriad of paint, primer, bondo, and bare metal there. That brings a question to my mind. As you block sand that panel, how do you know when to stop sanding it flat? It may sound like a basic question, and you and other people with a lot of experience may know instinctively when to stop, but for most noobs, knowing when to stop sanding can make or break the whole paint job. If you sand too much, the areas with the filler will be below the level of the areas of the metal. You know the routine, that means to add more filler and sand some more, but unless you know when to stop, it could happen again. Thanks. There is no one right way to paint a car, but there are a whole lot of wrong ways
|
Fully Engaged
Posts: 162
Joined: Sun Apr 01, 2007 6:47 pm Location: Dallas, TX |
I sand the panel in an x pattern with a 17" flat board sander, the colors you see are original primer (gray on top or red), green original paint, the pink is filler that was done around 20 years ago, then the brown is a high build primer that was done about 15 years ago, all of it was in good shape and well adhered to the panel. There was no rust and I added only a minimal amount of filler to some areas. The picture you see is after I sanded off the clearcaot and paint that was on it. I helped that uder that paint was a very thick layer of high build primer all over the car, that meant I did not have to add hardly and filler at all, lust a lot of sanding. Once I got to that point, I sprayed the panel with a gray high build primer then shot a giude coat on it, I then sanded it again to see any low spots, I then spayed it with the red high build primer and did a final block sanding with 600 wet. But I'm not sure how to answer your question, how do you know when to stop? Practice I suppose.
Dallas, TX
|
Fully Engaged
Posts: 446
Joined: Thu Feb 15, 2007 5:23 pm Location: Ballarat, Victoria, Australia |
If you use a guide coat ... It's easy to know when to stop ... You stop when the guide coat is fully sanded away
I'd be tempted to take those panels back to bare metal to remove all the paint buildup... Having said that after all the work you have put into them now, there's no way I'd start from scratch I've never like the look of those wheels, but gee's they look fantastic on that car. It must be the modern cars they look average on ... They just don't suite them seeya, Shane L. The nutty Citroen guy...
|
No Turning Back
Posts: 686
Joined: Sun Jul 09, 2006 8:50 am Location: Rockville, MD |
Thanks. I know about using the guide coat when blocking the primer surfacer, but how about before that, when sanding the paint, and filler down? With all of the bare metal and filler showing, if it's sanded too much, too much of the filler will be sanded away, leaving a low There is no one right way to paint a car, but there are a whole lot of wrong ways
|
Fully Engaged
Posts: 446
Joined: Thu Feb 15, 2007 5:23 pm Location: Ballarat, Victoria, Australia |
The only way I can tell is by touch... If it feels up 'n' down (no matter how slightly) when you run your hand over it needs further repair. I have a permanent texta handy usually and circle any low bits I find, and mark any high bits with crosses (otherwise you may miss them, if you do they'll stand out like dogs balls when the shiny paint goes on) ... IMO it's impossible to tell if it's right by looking at it
bang any high bits down level and apply more bondo over the low areas and file again with a long board. I found if you just put bondo on the low bit it won't file back flat, you need to re-bondo the whole area being worked covering the 'low' bit as well. I'm assuming you have no idea how to use hammers and dollies like me(this is all I ever did, you can get a perfect finish this way). seeya, Shane L. The nutty Citroen guy...
|
No Turning Back
Posts: 686
Joined: Sun Jul 09, 2006 8:50 am Location: Rockville, MD |
Thanks for the replies.
I guess it will come with experience. The first round of guide coating/sanding will show where more filler is needed. There is no one right way to paint a car, but there are a whole lot of wrong ways
|
31 posts
• Page 2 of 4 • 1, 2, 3, 4
Return to Completed & In Progress Member Projects
Who is online
Users browsing this forum: No registered users and 214 guests
Powered by phpBB© 2000, 2002, 2005, 2007 phpBB Group
Advertisements by Advertisement Management