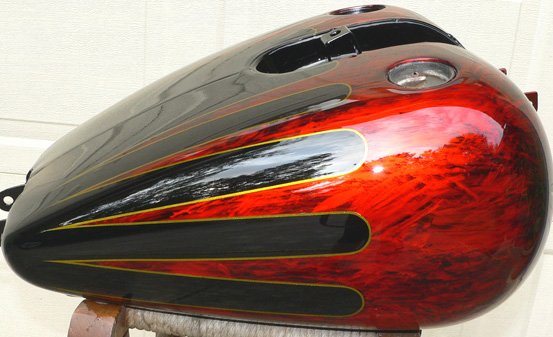
I have tried doing this a few times now and I havent been able to get an effect even close to stuff I've seen on the internet. I'm just looking for some tips.
What I did was spray the first coat of base and I gave it plenty of time to dry. I came back the next day to spray the second color then applied to plastic. I cant figure out were im going wrong. The first time I tried this I put the paint on pretty wet and when i put the plastic on it just took all the paint off. so the second time I just it on pretty thin and I think it dried to fast. I'm just trying to figure out what im doing wrong.
Thanks
marbilizer help
12 posts
• Page 1 of 2 • 1, 2
Settled In
Posts: 67
Joined: Thu Jun 30, 2011 8:12 pm |
|
|
Try a slower reducer and put it on medium wet.
Never argue with an idiot, he will drag you down to his level and beat you with experience.
|
|
Settled In
Posts: 67
Joined: Thu Jun 30, 2011 8:12 pm |
ok i'll have to get some slower reducer. I'm using a medium right now. Is there a certain ammount of time I should keep the plastic on? I've just been putting it on them taking it right back off |
|
Pull it right off then kinda wad the plastic you just removed and pat the edges or anything missed randomly.
Ed Hubbs had a good video but couldn't find it...here is an idea..... http://www.youtube.com/watch?v=67u3iA145_Q Never argue with an idiot, he will drag you down to his level and beat you with experience.
|
|
Settled In
Posts: 67
Joined: Thu Jun 30, 2011 8:12 pm |
ok Ill have to play around with it again. Would under reduceing or over reduceing the paint have any effect on it?
|
|
Ah marblizing, one of my favorite things to do.
Ok my first question, did you use House of Kolor marblizier? Second question - did you do a test piece first? Always do a test piece when using products and techniques that are new to you. Third question, did you reduce it? Never reduce marblizer! Why? Because marblizer is more of a mineral spirits type of solvent paint, than a regular acrylic basecoat solvent. Use it straight out of the can. Do not reduce! Do not mix reducer into marblizer. Here's the procedure for marblizing 1) Spray your basecoat layers, give them plenty of time to dry. 15 to 60 minutes, never more than 4 hours. 2) Now apply your marblizer. Marblizer is ready to spray. No mixing required. Stir the marblizer well. Strain into gun. Apply only to an area you will be able to lay the plastic wrap onto within minutes and remove to achieve the marble look. Too long a wait and the marblizer will dry and must be reapplied. You only have seconds, so do one item at a time. Like on motorcycle parts, I'll do the one side of the fender, then the other. Another trick, put some good quality, like gold masking paper on the wall. Spray the marblizer on that, quickly grab a piece of plastic wrap and pick up the marblizer with the plastic wrap, then wipe the plastic wrap across the surface of the part. You can use this method to create layers of marblizer. Wait 15 to 30 minutes in between coats of marblizer. Let each coat dry so its dry to the touch. if its sticky, wait longer. And another trick, when I open up the can of marblizer, most of the marblizer pearl is settled into the bottle of the can. I pour off more than half of the clear liquid into a clean mixing cup. Then I stir it the marblizer in the can and strain it into my gun. I use this more concentrated mix of marblizer. When I'm done I pour the exrra liquid back into the can. You can also use this extra solvent, mix it with whatever pearl you want and make up your own marblizer. HOK even sells Clear marblizer so you can mix your own pearl into it. 3) Now let the marblizer dry real well, 30 to 60 minutes. I usually wait over an hour as I normally do 3 layers of marblizer. 4) Now the most important step. Using House of Kolor SG100 Intercoat Clear apply atleast one medium coat! Do not skip this step!! If you do, you will have delamination problems. What will happen is when you apply the urethane clear, bubbles will form as the marblizer coats seperate. Applying the SG100 will lock the coats of marblizer together and lock them into the basecoat. That's why this coat of SG100 has to be applied correctly. too light and the coats won't bond. too heavy and it will mute and disturb the marblizer. So apply 1 or 2 medium coats. You can mix some candy concentrate into this clear if you want. 5) Let this dry for 15 -60 minutes then apply your urethane clear or candy coats. And that's it. AND MAKE A PRACTICE PIECE FIRST!!!! Test your materials and technique on a spare piece of metal. A fender, an old dented hood, extra bike tank. Always test and get the feel of how to use and apply these materials. Crazy Horse Custom Paint
And Author of How to Custom Paint Your Car http://www.crazyhorsepainting.com/ |
|
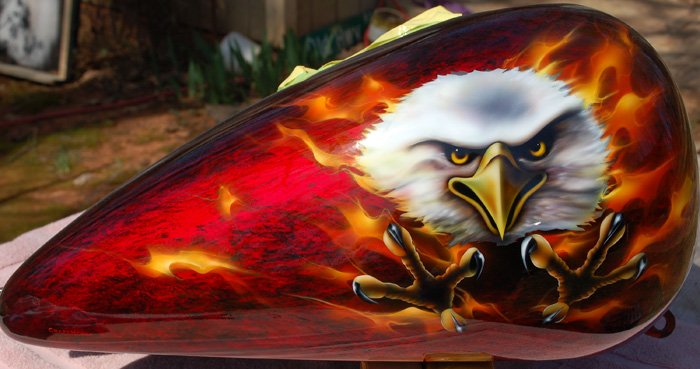
I did watch this video. I have never tried to use regular solvent paint as a marblizer. If you look at I tend to stick with what I know. Now I did notice that his booth was very warm and his paint was probably drying pretty fast. Do I recommend using solvent basecoat as a marblizer? I can't as I have never done it like that. Here are some images of marblizer I have done. And these were done with the technique I explained above.    Crazy Horse Custom Paint
And Author of How to Custom Paint Your Car http://www.crazyhorsepainting.com/ |
|
Settled In
Posts: 67
Joined: Thu Jun 30, 2011 8:12 pm |
No I wasn't using the house of kolor marblizer. I know I probaly should be but I'm just learning and I don't want to spend a lot of money to practice. I just using some left over paint from other projects to try and get the hang of it first. I've watched a bunch of youtube videos on it and most of them were using just regular solvent paint. Thanks for the tips though. I am really looking forward to playing around on some smaller pieces to try to get the hang of it. I may just have to actually spend the money on the HOK stuff lol |
|
The thing about solvent paint basecoats is this, anytime you spray a solvent basecoat over another solvent basecoat, it penetrates into the basecoat underneath it. Unless that lower layer of basecoat is catalyzed.
But what happens when you spray that new layer of basecoat on there, it has reducer in it, that reducer will soften or eat into that basecoat you are spraying over, softening it. So when you wipe it with the plastic, chances are, you'll pull off the new paint and the paint beneath as it has been softened by the newly applied paint and is now attached to it. One question I have for these guys that do the marblizing this way, are they doing over catalyzed basecoat? or a catalyzed urethane? if you are working over urethane you should be able to do the marblizing with the regular basecoat, as it doesn't deeply penetrate the catalyzed surface. So it should wipe up. But the dude in the video looked like he was just spraying regular basecoat and not waiting too long. I have always used the HOK Marblizer for this . Its pretty foolproof. But here again, doing test panels are where its at. Learn on those panels and spare pieces. Its amazing what you can learn on your own just by messing around. Then apply those lessons to the job you are working on. Crazy Horse Custom Paint
And Author of How to Custom Paint Your Car http://www.crazyhorsepainting.com/ |
|
Settled In
Posts: 67
Joined: Thu Jun 30, 2011 8:12 pm |
I think thats what part of my problem is. Beacouse when I put the plastic on I can see a few spots where it pulled both layers of paint up. I'm just going to have to keep playing with it, When I get a chance I'll post some pictures of what I'm doing, What excatly is a catalyzed basecoat? I was thinking about just spraying some clear over the first layer to keep it from getting into the first layer of paint do you think that would work? |
12 posts
• Page 1 of 2 • 1, 2
Return to Airbrushed Art & Custom Painting Discussion
Who is online
Users browsing this forum: No registered users and 2 guests