Dent puller help
15 posts
• Page 1 of 2 • 1, 2
Non-Lurker
Posts: 2
Joined: Mon Dec 10, 2012 11:00 am Location: Natchitoches, LA Country: USA |
First post so please bear with me. I recently bought a project that requires some body work, it has a large dent in the Left rear quarter, I can't get to the back side of the dent due to some internal bracing so I bought a stud gun and plan on pulling it from the front side with a slide hammer. Question is, the instructions with the stud gun say to start pulling in the center of the dent, and from a search on this suite says to start at the edges of the dent and work your way inwards. Which way is correct? Thanks in advance, John
|
 Top Contributor
Posts: 3110
Joined: Wed Dec 01, 2010 10:52 pm Country: USA |
Pulling from the outside circumference to the middle of the dent will be the best most of the time. It will not stress,warp, or stretch things so bad. If its is a small ding then the middle should be ok. Pics help....
Never argue with an idiot, he will drag you down to his level and beat you with experience.
|
Non-Lurker
Posts: 2
Joined: Mon Dec 10, 2012 11:00 am Location: Natchitoches, LA Country: USA |
Here's a photo of the dent. There is an internal brace on the trunk side that prevents working it out from the inside. I picked this car up for cheap, it wasn't running at the time, so far I have about $85 into it to get it running, and with the dent gone and the quarter resprayed, I should be able to make a little money on it.
 |
Top Contributor
Posts: 3110
Joined: Wed Dec 01, 2010 10:52 pm Country: USA |
Need to remove the bumper and tail light first. That needs to worked outside to the middle and it will take awhile and a lot of studs. Wiggle wire would work too but you have to invest in the setup and use a come-a-long or a good slide hammer. A steck stud lever would work pretty good. There is another lever puller that is a little cheaper and will work too I just can't remember the name. Hope this helped.
Never argue with an idiot, he will drag you down to his level and beat you with experience.
|
Fully Engaged
Posts: 431
Joined: Sat Jan 14, 2012 2:22 pm Country: Canada |
Like was mentioned before you need to remove the tail light and bumper first.Before you do any work on the low spot you need to return the bodylines back to there original spot.The line close to the bumper is the first one to fix along with the line up by the tail light.Use a straight edge on the other side for a reference to check your progress.I would seriously look at maybe removing part of the brace(weld it back in after)I would use a porto power wedge with a 2x4,or a nice wide spoon/chisel with a hammer and carefully tap out the lines first,or possibly weld on a pull tab for the bottom line.Once you have your lines where you want them most of the damage will have come out with them and then you can fix the ridges and low spots and smooth everything out with a hammer and dolly,spoon,or whatever you have.
Some pics of the inside of the trunk might be helpful. |
|
Top Contributor
Posts: 6234
Joined: Tue Sep 16, 2008 1:17 pm Location: Pahrump NV. Country: USA |
That's gonna require some pulling to straiten, I would do some pulls first before starting with a slide hammer.
Looks to me like the damage is from a hit from behind in witch case it needs to be pulled back wards first, i could be wrong but thats how I read the panel from the picture. Here is some pictures of a cheap home made puller I made using using studs with a come along and a Chery picker. works good for light pulls, any seriously heavy pulls I would use something other than weld on pins. 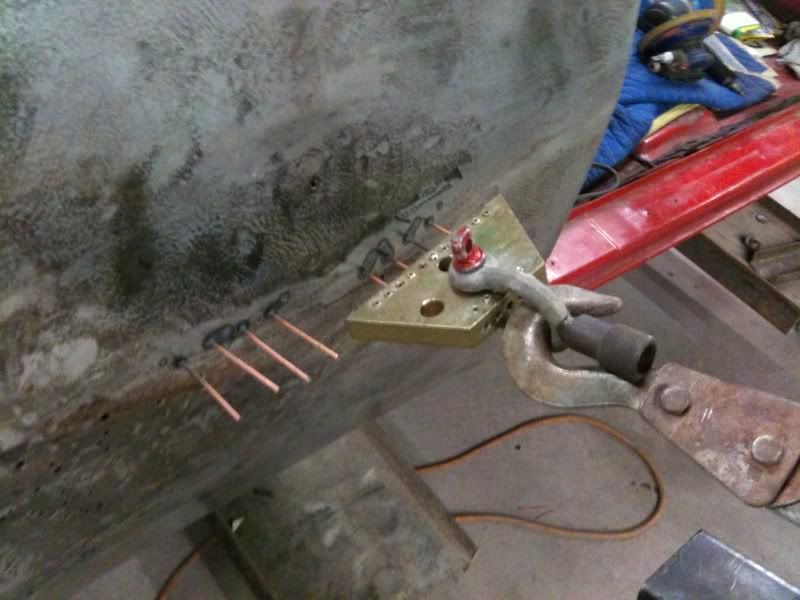 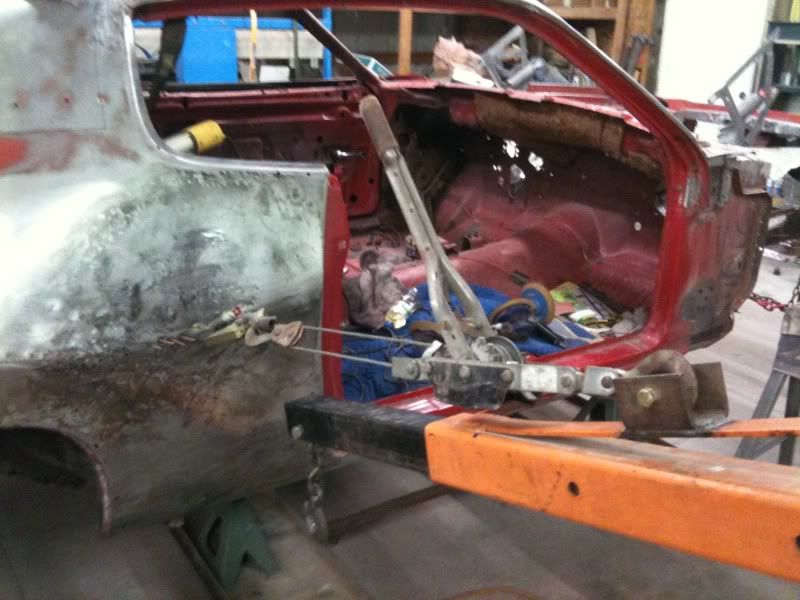 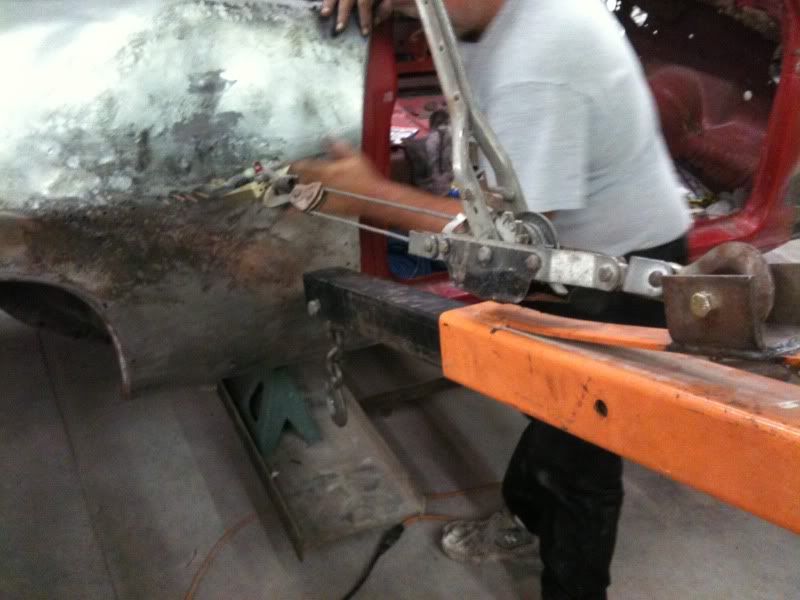 Dennis B.
A&P Mechanic, FCC General radio Telephone Operator Line Maintenance A&P Mechanic and MOC Tech specialist. |
 Top Contributor
Posts: 3459
Joined: Fri May 26, 2006 10:56 am Location: Oregon Country: USA |
The above posts are correct about needing to restore the body lines first. A pull on the QP going lengthwise would be a good start before you push/pull the dent out.
Once you get the tail light and bumper removed, you might find yourself having enough room to get in behind the braces. I have seen some serious paintless dent removal done through the headlight and tailight holes in the fenders. Of course, that panel is probably too far gone for PDR. At least it will give you enough working room to get behind it with a lever and push some of it out. Then I would work it with a hammer and a spoon dolly. Sometimes I can get behind it with a slapping dolly and carefully tap the area from the outside with a hammer. Finally, use a stud gun or weld a plate and pull any creased areas of the dent. Then you can go back over it with a spoon lever or slapper to smooth out the panel. |
 Settled In
Posts: 70
Joined: Thu Jul 27, 2006 11:00 pm Location: Nanaimo, BC Canada |
[quote="Doright"]That's gonna require some pulling to straiten, I would do some pulls first before starting with a slide hammer.
Looks to me like the damage is from a hit from behind in witch case it needs to be pulled back wards first, i could be wrong but thats how I read the panel from the picture. Here is some pictures of a cheap home made puller I made using using studs with a come along and a Chery picker. works good for light pulls, any seriously heavy pulls I would use something other than weld on pins. I like this idea, and will likely "borrow" it from you. How do you keep the cherry-picker from moving toward the car...block the wheels against the car somehow?? thanks, Mark 1969 Charger Survivor with 63,000 original miles.2-1972 Satellite projects currently under attack...by me!1971 Road Runner 383, 4spd awaiting my attack!
|
|
Top Contributor
Posts: 6234
Joined: Tue Sep 16, 2008 1:17 pm Location: Pahrump NV. Country: USA |
Hi mark No Im not blocking the wheels it takes a bit more than that lol. I have the car chained down to the floor and I have the cherry picker chained down to the floor. I used a concrete drill bit & drill and put simple concrete locking Thread inserts into the floor so I can put bolts threw chains & into the floor. I'm using fairly good size chain, inserts & bolts Like 5/8" - 11/16"? (don't remember size) Works fairly well. I haven't broke my shop floor yet  Put the Inserts in fairly deep if you can and know what your shop floor thickness is. (important part) Mine is over a foot thick in places, This allows you to put the insert in deeper and use longer bolts for more strength. Because most of what I do is light pulls most of my inserts are just below the surface of the concrete like two inches down, But I have some over 6" deep too were I know my concrete is over a foot thick, My slab is 6" thick over all and has added fibers in it to increase strength, I poured it myself wish I had added Tie down pots when I poured it. I have yet to pull one out or have one fail, I'm sure it will be catastrophic when one does fail   PLEASE be careful. PLEASE be careful.I would hate to hear how some one got hurt using this idea, again please use some common sense I'm using multiple tie down points on the car and the cherry picker to spread the forces out, and even then I'm still doing light pulls. You'll need lots of chains, chain binders, Come-a-longs and multiple tie down points to do this safely, a minimum would be 4 tie downs on car and two on the cherry picker and that's just the minimum for me to do a light pull less than a Ton, I'm sure I could pull harder but I haven't had a need too if a car needs that hard of a pull I would send it too a real frame machine and some one who knows what the heck there doing. I try to keep chains all equal lengths and square from car to the ground and same for the cherry picker/puller. Good luck and please be careful 
Dennis B.
A&P Mechanic, FCC General radio Telephone Operator Line Maintenance A&P Mechanic and MOC Tech specialist. |
Settled In
Posts: 70
Joined: Thu Jul 27, 2006 11:00 pm Location: Nanaimo, BC Canada |
Thanks so much for the detailed response, especially for the safety warnings, as that is most important. I may consider some of the suggestions regarding drilling some anchoring points into the concrete.
Mark 1969 Charger Survivor with 63,000 original miles.2-1972 Satellite projects currently under attack...by me!1971 Road Runner 383, 4spd awaiting my attack!
|
15 posts
• Page 1 of 2 • 1, 2
Who is online
Users browsing this forum: No registered users and 74 guests
Powered by phpBB© 2000, 2002, 2005, 2007 phpBB Group
Advertisements by Advertisement Management