Welding burn thru
No Turning Back
Posts: 602
Joined: Fri Feb 03, 2017 7:36 am Country: USA |
Gap has nothing to do with it. It has to do with your metal being heated to melting point and cooling. Doing this with a MIG is a bit harder. With TIG or gas, and NO gap, you can fusion weld the pieces together, no filler. This way, when you hammer it stretches the metal, with no additional metal. Should work easier, and more accurately. When you add filler metal, now there's more metal in that area, and if you hammer it to the correct thickness, it will cover more area, like it was over stretched. And MIG is a harder weld, so it takes MORE hammering, and is more likely to crack when doing more. But this is not an exact science for most of us, so whatever stretching you do, as long as you don't overdo it, you are using less filler. And that's a good thing.
|
|
Top Contributor
Posts: 6234
Joined: Tue Sep 16, 2008 1:17 pm Location: Pahrump NV. Country: USA |
 New wheel well lip, Tacked on with filler rod every inch or so with zero gap then Fusion welded with no filler rod. Yes I still had some grinding and yea I still had some Hammer and Dolley work but both were minimal. As compared to a Mig? OMG! one is heaven the other pure hell. This was with strait 35-38 amps? no pulse 3/16" 2% Lanthanated Tungsten sharpened to a point with No gas Lense & a small cup best I can recall. Is it perfect Hell no! I need a lot more practice my welding skills suck! but it will work. Note the #30 drill bit holes mid pic and one at bottom, these were used when I over lapped the new metal over original metal and held the two together with Clecos while I used a small body saw to cut both to get perfect fit up with a little file work. easy peazy to fill with Tig. 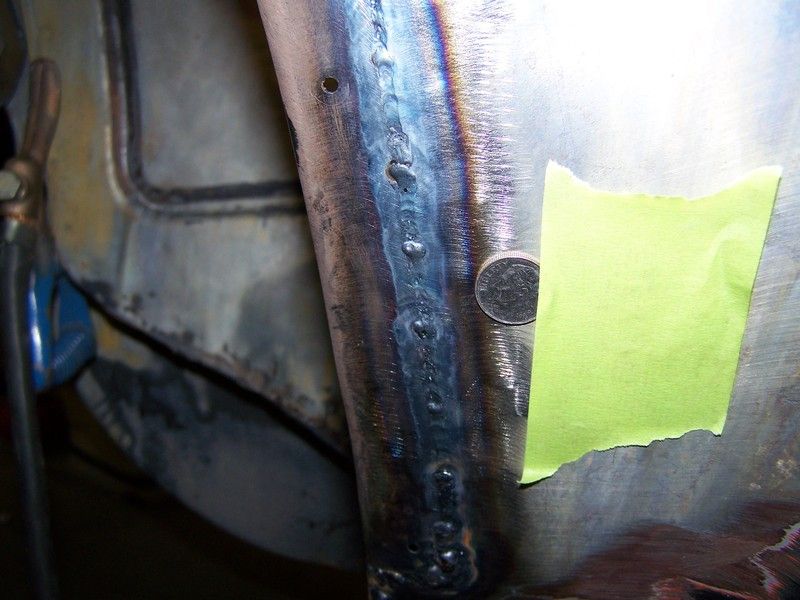 Dennis B.
A&P Mechanic, FCC General radio Telephone Operator Line Maintenance A&P Mechanic and MOC Tech specialist. |
No Turning Back
Posts: 602
Joined: Fri Feb 03, 2017 7:36 am Country: USA |
That's looking REAL nice, Dennis! Kudos!
|
Settled In
Posts: 51
Joined: Tue Jan 01, 2019 1:27 pm Country: Canada |
I'm guessing tig welding doesn't produce the heat of mig? Those are some nice looking beads Doright.
|
No Turning Back
Posts: 602
Joined: Fri Feb 03, 2017 7:36 am Country: USA |
TIG is actually hotter than the MIG. But it is such a concentrated heat, you can melt your seam, and move quickly. This faster speed leaves a smaller heat affected zone. It is also a softer weld, since it air cools, so it's easier to hammer and dolly the seam.
|
Settled In
Posts: 51
Joined: Tue Jan 01, 2019 1:27 pm Country: Canada |
And I thought I was making the right move when I bought my mig welder lol. See, one is always learning!...but for now, I will have to tough it out with the mig... I do appreciate the feedback. You guys are great on here. Lots of learning to do! At my age, 60ish, I can't believe how almost obsessed I am with body/metal work!...maybe my second wind in life! |
No Turning Back
Posts: 602
Joined: Fri Feb 03, 2017 7:36 am Country: USA |
The good thing is, with the MIG, you got a faster start and are able to do your work without lots of practice, and trial and error (if not going to welding school). MIG isn't so bad, but it's not the choice of people who value high quality in their metalwork. I still use MIG on sheet metal, for customers who want their job done with reasonable cost. Or if I cannot access the back side of the repair, for hammerwork. All forms of welding have a place, I TIG when I have the extra time, or for quality work, and still use gas to weld, when the area needs more shaping than usual.
|
Settled In
Posts: 51
Joined: Tue Jan 01, 2019 1:27 pm Country: Canada |
So just an update, I've managed to dolly my patch more than I originally thought I could. It's definitely not perfect nor would I expect it to be but I got it to a point where 'I'm' not completely embarrassed about it. Still welding a spot here and there. So as I'm learning, I weld, I grind, I weld some more, a burn thru here and there...more welding lol It's a viscous circle! So I'm realizing that because of my little experience with this I'm noticing always a pinhole here and there on my welds once I grind them down. I try not to over do it. I read all the articles here about the technique of getting it to a point where you are finished but I try and reweld pinholes and I start this cycle of events. So what I'm wondering is, all you guys out there doing this, of course experienced, wouldn't have this problem but once in a while there must be the odd pinhole to deal with? Can I just seal both sides and move on?? I want to do as good a job as I can but eventually I have to decide it will not be perfect and move on. I'm learning. It bothers me that I can't be better but I read about you guys with all your years of experience and I realize that's not going to be me. This is the best I can do for now! My local supplier here suggested to coat the backside with fiberglass resin? This sound okay?
|
|
Top Contributor
Posts: 6234
Joined: Tue Sep 16, 2008 1:17 pm Location: Pahrump NV. Country: USA |
Jim
Most of us started with Mig Most are still using a Mig for their own reasons. I only use the Mig process when it fits the repair I am doing I use Mig, Tig and Gas just depends on the repair, Where its at how easy it is to get access too how strong repair needs to be and what I want after welding. I learned how to weld with Gas Originally then played with Stick and then bought a Mig and loved it! A Mig is great for welding so many things BUT Thin sheet metal is not one of them in my opinion. You would be better off Gas welding Body panels in my opinion yes your gonna have a Bigger heat effected zone BUT gas welding weld Bead is softer and easier to Hammer and Dolly than Tig weld bead yes this means whole panels being affected by heat requiring More Dolly work to straiten. It really is possible to Gas weld with the precision of a Tig IF your really good I have seen it done. Gas really is the best for Auto sheet metal and its cheap to get into! https://www.youtube.com/watch?v=Rv5bKXJ3kEM That said Yes Mig weld bead SUCKS! Yes its rock hard, Yes it cracks when Hammer and dolly-ed, Yes its very Porous and Yes you got pin holes! these are the things the promoters of Mig welding thin sheet metal never talk about!!! Or Show in their pics! After your happy with cleaning up your bead this means grinding front and back doing ALL your hammer and Dolly work, Paint BOTH sides with EPOXY Let it fully cure this can take DAYS depending on Temps! SCUFF it THEN Yes cover both sides with Fiberglass filler Sand as required before paint. There are many opinions and thoughts on what to do with Weld bead: Some say to metal treat both sides of weld with a Phosphoric acid treatments before Epoxy, As a rule Epoxy does not like acid of any type! so cleaning surgically clean after treatment is a Must and easier said than done! Advanced stuff not for the lazy Stay away from Acids Till your really willing and able to completely neutralize and surgically clean the metal after treatment this point can not be overstated! Super clean Lots of soap and water, YES water! and SCRUB! red Scotchbrite and YA! YOUR GONNA GET WET! I like this process for rust protection with a Cold Galvanizing system I use I do whole cars this way But I get help I get a few people involved with the process. ------------------------------------------------------------- I have played with just cleaning with Alcohol first As Alcohol is water based, then cleaning with Acetone or MEK then painting with Zinc rich Epoxy followed by Fiberglass and have had good results so far. -------------------------------------------- Another Idea is to Tin it and then use Lead which would be the ultimate in my opinion as The Tinning coat will not stick to metal unless its super clean and rust free. Chevman is the guy to talk to about lead hes got it down really good I encourage you to check out his Nomad Build. viewtopic.php?f=12&t=17047 https://www.youtube.com/watch?v=87fuTnBS2bE Another idea which would be really cool is Brush Plating which is really out their and over kill BUT would be really Cool. BOTH require surgical Cleaning before and after repair! ---------------------------------------------- Some just Grind there bead and cover with filler and Paint the car and swear by it!!!! Point being its your car their is no rite or wrong, really! its up to you decide which is best. Dennis B.
A&P Mechanic, FCC General radio Telephone Operator Line Maintenance A&P Mechanic and MOC Tech specialist. |
 Board Moderator
Posts: 9897
Joined: Fri Oct 20, 2006 12:40 pm Location: ARIZONA |
I use a MIG for nearly everything on automotive work.
.023" wire for the thinner metals and .035" for the thicker stuff. Here you can see where someone decided to cut some big speaker holes into the doors. The passenger door required two patches to be welded into place. I did the upper patch first: Then the lower patch: The driver's door need the upper portion reconnected and then a patch welded in on the lower portion. Of course my welds aren't perfect but these are a whole lot better than when I first started. Getting the MIG wire speed and heat settings right takes some practice. There are videos out there that show what the weld should look like and also how to troubleshoot your welds. Once you get a setting that works for a particular thickness, write it down. This gives you a great starting point next time. 1968 Coronet R/T
ACTS 16:31 |
Who is online
Users browsing this forum: No registered users and 46 guests
Powered by phpBB© 2000, 2002, 2005, 2007 phpBB Group
Advertisements by Advertisement Management